
- Details
- Category: General Topics
- Hits: 1076
Big Mama Cetus in Heat Again!
 Tiertime - Cetus sent me (gratis) repair parts for my heated bed cable fire. It is a new accessory board kit which includes the accessory controller board and a new 20 conductor ribbon cable as well as the other kit parts like the white printed case and a power feed cord for the main controller board. All the parts in the standard purchase kit.
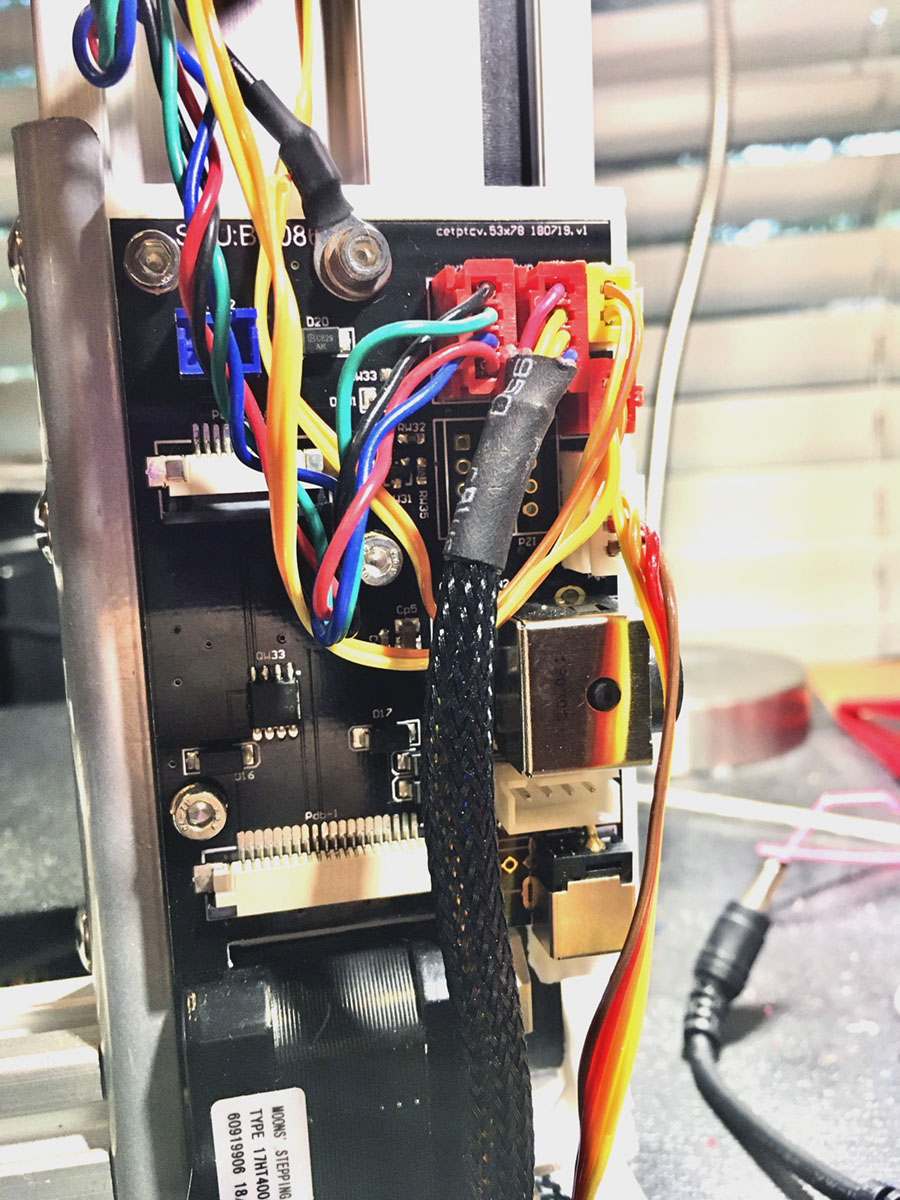
It was the 20-conductor ribbon cable that melted and burned. The end of the ribbon cable that connected to the accessory board showed evidence that it too had overheated. Indicating there was probable damage to the ribbon connector device on the accessory board. (large white horizontal bar left beow center in picture)
It was very good they sent both the board and the cables. I assume they are part of the standard accessory board kit.
I have replaced the parts and again operating Cetus with a heated bed.
There was a slight issue when I tried the first test print with the heated bed. After UP Studio sliced the print and sent it to Cetus, there was a small audible “clink”, Cetus stopped dead and UP Studio reported that Cetus lost connection. Very strange behavior. This behavior continued on three more attempts to run the test print.
Re-booting everything did not fix the issue. Then I used the manual pre-heat to test heating the bed. It heated the Cetus build platform exactly as expected. Then I went back to trying the test print again. This time it continued past the “die” point and the test print completed perfectly.
I believe the Cetus Processor does some very strange “caching” of its previous experience and/or setup. Its’s not been the first time I have seen the Cetus printer OS acting strangely. I believe it tends to use cached data without checking if a new “read” from UP Studio is available.
I usually do a “clear the SD” within printer setup and I know I didn’t do that this time. Probably the cause of the crash. I’ll remember next time.
Big MAMA Cetus is again a hot babe. Fingers crossed she doesn’t get too hot!
- Details
- Category: General Topics
- Hits: 1084
 20 conductor Cetus Mk3 heat bed cable with vaporized center trace.Big Mama Cetus blew her cool again right in the middle of a normal print. This Hot Mama is going to be sent to a quite religious Convent where she can live the life of a reformed sinner… with no more hot flashes.
Good thing I was sitting right in front of the printer, when about halfway through a normal operating print, the heated bed ribbon cable suddenly burst into a large puff of smoke. This is the second time, so I knew exactly what was happening. I immediately lunged for the “power off” switch on the side of the printer.
A power trace in the middle of the ribbon cable had again (2nd time) vaporized the plastic coating.
I took micro-photos of the cable ends. The problem originated in the controller board end of the cable and NOT at the heated bed. The picture shows a group of “cooked” contact points.
The cable connectors and the cable itself is NOT CAPABLE of sustaining the load of the high power that it is required to pass. While multiple traces in parallel are used to distribute the power load in the cable, it is clearly evident the tiny terminal contact points are not intended for such power loading long term. In my case rather short term.
If I had not been present when this happened, I could have easily suffered a tragic fire and perhaps severe loss of property and worse case, life.
The Tiertime Cetus III Heat bed system is a serious defect in design and engineering and all users should disconnect the ribbon cable immediately and cease heated bed operations.
An outstanding minimalist printer has become a possible life threatening monster with the upgrade to the high power heated build plate. IT IS DANGEROUS!
I will continue to use this printer without the heated bed ribbon cable. All other functions and control have tested normal, and no collateral damage to the printer has been detected.
I have suffered two (2) exact same cable failures on the Cetus Mk3 high power heated print bed. There will not be a third.
 |
 |
| Heat bed end, no apparent damage. | Controller end. Severly overheated connection traces. |
UPDATE 8/26/2020:
Tiertime (Cetus) has contacted me. They will replace the damaged controller board and failed 20 conductor cable under warranty. This will be the third board and cable. This repairs the damage. Not sure that it will cure the problem. Best they can do for now. Thank-you Tiertime.
- Details
- Category: General Topics
- Hits: 1199
 I have to take Cetus MK3 off my recommended 3D printer list. At lease until it gets some improved firmware The Mk1 and MK2 are a great bit of hardware Extremely accurate and capable movement, but still have some faults, like having no physical bed leveling.
The leveling, including the the electronic software leveling are not true bed leveling. The software leveling is simply for determining a nozzle height so an over-thick raft can be built level with head movement. Thicker in low areas, thiner in high areas. The plan is to compensate for a few tenths out of level. In practice the Cetus bed can be several millimeters off level.
This all-but-eliminates printing without a raft.
What amazes me is all the Tiertime printers use this same method. The more costly printers DO HAVE mechanical bed leveling, so the auto leveling really is a belt and suspenders feature. Extra measure but not really needed.
The Cetus MK3 ROM can not handle g-code like the MK2 and MK3. Trying to run g-code, even the gcode made by their own "Catfish” advanced slicer, will crash the bed temperature sensing algorithm in the MK3’s ROM. Temperature reading and control go spastic, even after returning to UPStudio.
It happened when I first got my MK3 and it Just happened again after I changed hardware to fix the first issue. This time I was able (so it seems) to have recovered the bed temperature control. I had to reset and refresh the ROM, Reload UPStudio, and let Cetus set for about a hour to cool down and it finally reset.
I tried so many things I can not be sure exactly what provided the “fix”. I don’t want to deliberately crash the OP system again just to find the simple fix, if there is one.
Cetus requires two major improvements to work properly beyond stock operation.
- Mechanical bed leveling
- Proper g-code operation especially with Catfish. Tiertime’s own advanced slicer
Other issues are the feeble flat cable feeding the heated bed. I have had two cable fails. The new perforated build plate is very difficult in raft removal and simply can not be used for no raft printing.
The heated bed is bolted directly to the X-Axis linear bearing. The possible 100C+ (212F) bed heat is transfered to the bearing, linear rail, and into the printer case. I expect short life for the bearing if constantly running a heated bed. (Bearing lubicant vaporization)
I have had "run-away" Build Surface heating up to 180C and the printer case got so hot it shiut down on thermal overload.
All major Cetus issues stem from the primitive build surface plate and it’s simple bolt-to-the-bearing mounting system. No problem with an unheated build surface. A heat-isolated mechanically adjustable bed is needed.
Cetus was/is an experiment in minimal hardware, so as not to compete with the major Tiertime product line. The MK1 popularity succeeded beyond expectation. However, the "advanced" Mk3 has become a Kludge. (Clik link if you do not know the meaning...)
I love the prints that Cetus will produce, but the MK3 machine can not (now) be recomended for the biginner.
- Details
- Category: General Topics
- Hits: 1041
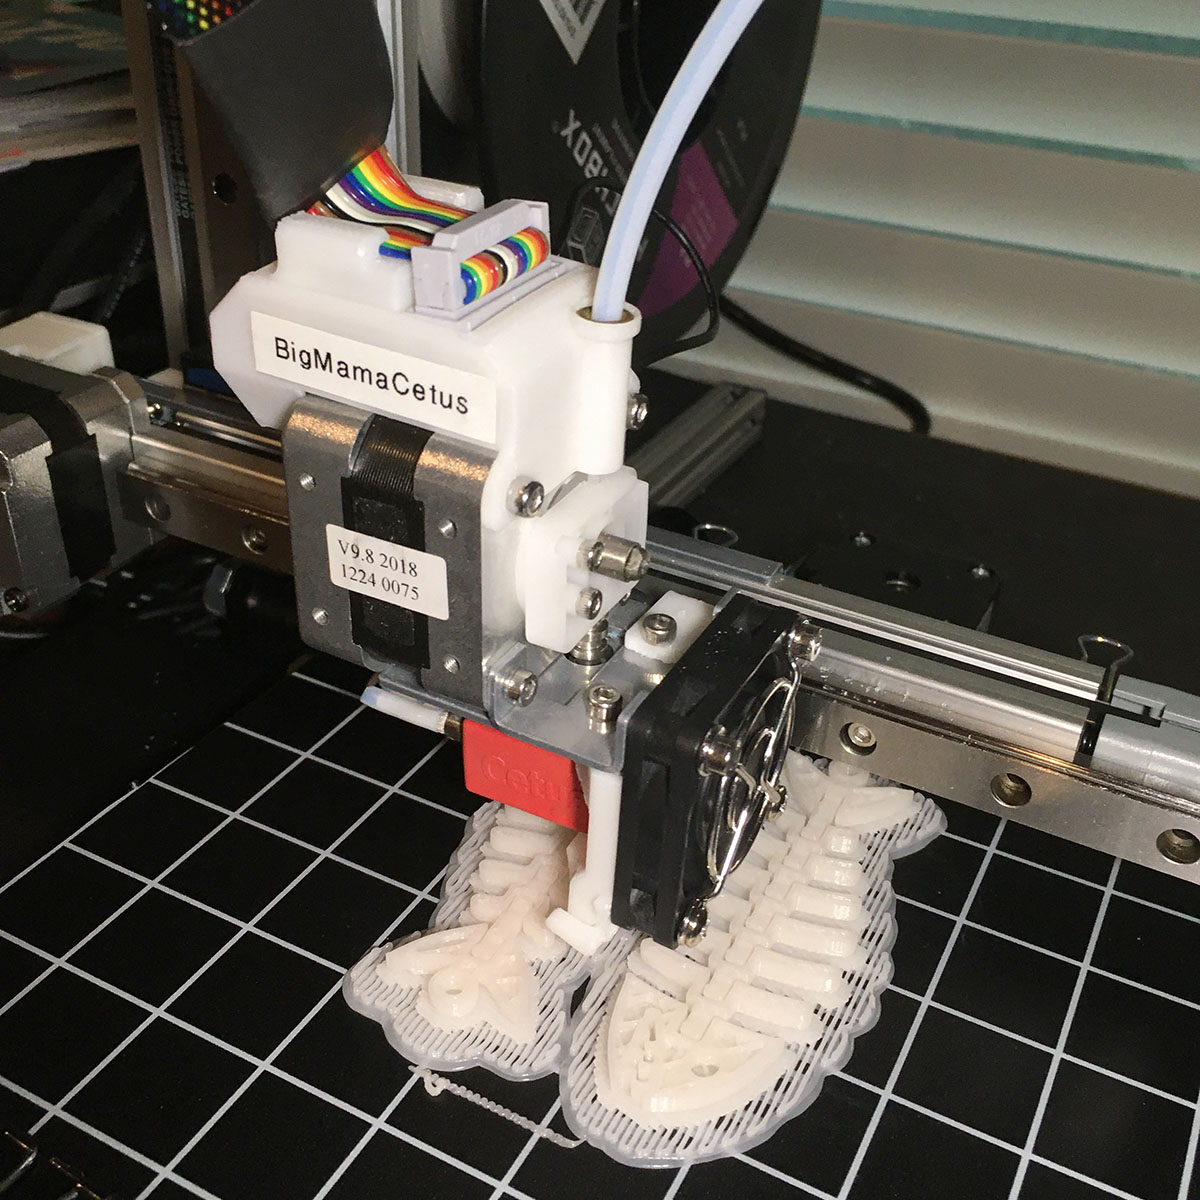 The newest 3D printer in my fleet is now sailing wonderfully after a rather rough start. The getting started problems have been reported in previous posts. That’s BMC (BigMamaCetus).
It’s a minimalist design. The features of its smaller sister (MamaCetus) with added nozzle height sensor and heated build plate. These added features make her less simplistic and were the source of the initial issues. But, now in full operation, she really performs as expected.
My two Cetus printers (a MK1 & MK3) will remain my go-to printers for many of my single-color prints. BMC will permit me to use other than just PLA for plastic. I will be experimenting with other materials. I have already run a castable wax filament through BMC.
There is also an extended version of Cetus available. I do not print tall models so have no desire for added height. With a moving bed, I see possible issues with printing at great height distance from the build plate. Not a tested theory. Just my estimation of design.
I have a very nice Delta style printer with a non-moving bed and great build height available. That is my choice for tall prints. Print quality there is also excellent.
The recent Tiertime/Cetus support department issues will take the product line off my newbie user recommendation list. Too bad. I am in love with my Cetus printers. Not perfect for every use, but nothing ever is. The UPStudio slicer is weird (there is a new version promised) but I have learned how to run Simplify3D gcode on Cetus with great results. But I use UPStudio for most prints. It gets the job done.
That’s my story. A great little printer. A puzzling support system that sometimes works well, but is not well organized in presence, publication and performance. I rate them 5 out of 10 on my customer satisfaction score. A “user forum” and Facebook posts no way substitutes for one on one customer service.
The hardware is a solid 8.55. :)
- Details
- Category: General Topics
- Hits: 1261
If You Have One Head, It Lasts All Day...
"Bit-O-Honey goes a long, long way..."
 Geeetech A20TThree dimensional printing has been a love/dislike experience for me. I love the technical and specialized skills required to be proficient. I dislike the fact that I am making nearly worthless plastic Junque.
Recently I realized, doing the 3D printing process was my enjoyment and the cheap Junque was OK if it looked good.
I ventured into multi (2-color) printing to see what that could do. I bought a Geeetech A20M, single nozzle, two filament printer. The previous posts shows what it can produce.
Been doing a lot of study on multi color printing. When I started with the A20M, I wasn't sure where I was going with it. It's got me hooked for the "artsy" printing. One color has become boring except for purely functional item printing.
I have determined the blending two or three feeds into one nozzle is the most versatile and interesting method for me because of the color blending that is possible.
The IDEX (two independent print heads) and single head dual nozzles are the best choice for soluble support and are well supported by present slicers.
IDEX is also the only way to do large dual prints if that is a desire. Dual print size is not limited by fixed nozzle separation
Multiple fixed nozzles bring their own host of challenges with alinement, nozzle drag, and oozing. Also cook-off if a nozzle sets unused at print temp for too long.
Nothing is perfect with either multiple or single nozzle multiple color FDM. There are coding and tricks to mitigate most of the known issues. That's what I have been looking at.
Wiping and proper parking of the idle print head is a must with IDEX. Except for possible print alinement issues of two independent moving heads, I like it better than two nozzles in the same head. That's only a "like", not a tested experience. Mainly because it gets the oozing nozzle away from the print area.
But... The color blending single nozzle is a huge feature for me. Nozzle purge is actually required by all types of these printers. That alone is not deal breaker. Just part of the process.
I am putting the IDEX and other dual nozzle printers in the "serious prototype" category. They are the best (only) way to do special and complex supports. Shut down one nozzle and you have a great single color printer. Another color is ready to go.
The blending single nozzle is the "artistic" system. Color blending is far from perfect as I have discovered, but it is "artsy" and the non-predictability of color blending is a feature.
I just saw the three color version of the A20M. It is the A20T (T for Three or triple color.) (See picture.) I can imagine how three colors will behave.
Push button set-up and printing is NOT yet available for triple feeds. 3 colors single nozzle are well ahead of the curve for automation. But it is entirely feasible and possible process with all major slicers. S3D, Cura and Repetier-Host can slice and run 3 nozzles. The user has to know how.
I presently have working examples of all three slicers. They will need some additional tweaking for sure. The operator person is not D.I.W. for slicers for the A20T.
Three color printing is definitely NOT for the newbie. A guy I watched on Youtube doing crappy fast printing on a A20T made me sick. He just wanted to be first with a video. No finesse or technique. It did show me that ANY schmuck can operate the printer.
Well, I guess I am sold on an A20T. Just need to fall off the edge of this cliff in front of me. It's so far down, I can't see the bottom. Maybe I'll fall forever??
What? Yet another printer???...
- Details
- Category: General Topics
- Hits: 1412
UPS for 3D Printing
 The three-dimensional printers see a lot of run time here at KautzCraft Studio. The larger prints run for twelve hours or longer. A lot can happen in that time span. Here in Texas and I am sure everywhere else, the weather can change for the worse.
That can lead to power interruptions which can kill a print job in the eleventh hour. It has happened often enough that it became a high priority to find a solution.
Many of the newer three-dimensional printers now offer power interruption protection and can be restarted where they are stopped mid-print and resume the print. That’s not always a perfect solution as the printhead is not parked in a “safe” area above the print and can actually “glue” itself to the print as the heat goes away.
The “pause and resume” works well, but when the power is instantly gone as in a power outage, the pause move (to a safe location) cannot be executed.
The obvious solution is a device called an Uninterruptable Power Supply or UPS. The link will lead to additional information. Often called a battery back-up. Used with any electrical device (like computer equipment) that must continue to operate when normal power is interrupted.
The UPS is a power line (usually 120 volt) battery backup system. A relatively large capacity low voltage rechargeable battery is maintained in a charged condition and is connected to a converter (inverter) that produces 120 volts alternating current.
The converter (inverter) is instantaneously energized and switched to carry the load when the normal power fails as during an electrical storm or other reasons.
A UPS is a perfect solution for saving 3D prints that have a lot of time and material required in their creation.
There are many sizes, brands an features available when selecting the UPS for this task. The choice was a given for me as the brand is owned by my last employer, Schneider Electric -- owners of the APC brand. We used them exclusively as back-up in our energy management control systems.
The proper sizing is the important decision. The UPS is generally intended as instant replacement of power when the normal source in interrupted. Its action is “instant on” invisible and instantaneous supply of the (usual) 120-volt power. The load never “sees” the power loss.
The UPS is NOT generally intended a replacement for back-up mechanical power generators. It is the “gap filler” between a power failure and the startup time for a motor-generator or other long-term power supply.
That reduces the cost and maintenance of needing a high capacity UPS. Batteries are maintenance items and need replacement. But the purchaser is free to choose the capacity and run time they need for the application.
My choice with 3D printing is a UPS run time of not more than one hour. Thirty or as low as fifteen minutes would be adequate. My desire is to ride through the usual one or two second “blink out” that we usually suffer in a weather event. Long term outage is rare and a risk I will accept for a print loss.
It’s the frustration of those few second outages killing a long print that the UPS is intended to relieve. Starting a print in the morning and hearing thunder in the afternoon is not comfortable and cause anguish.
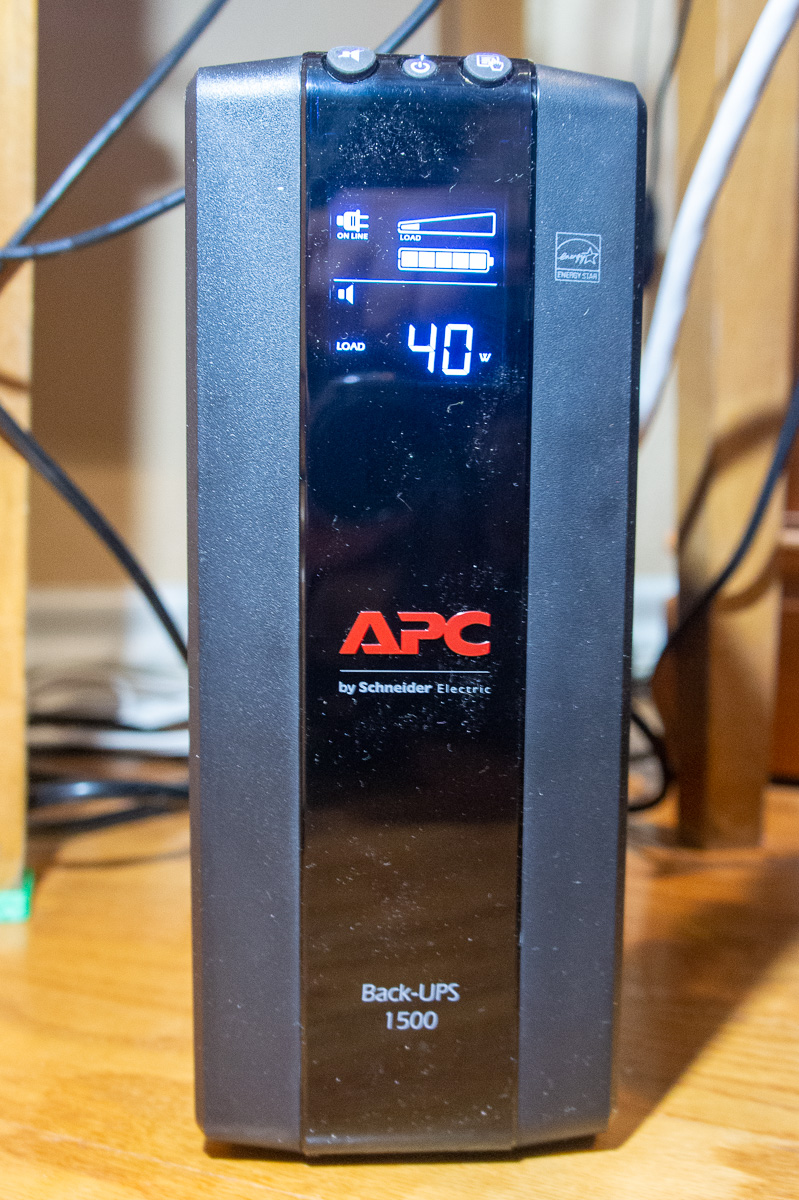
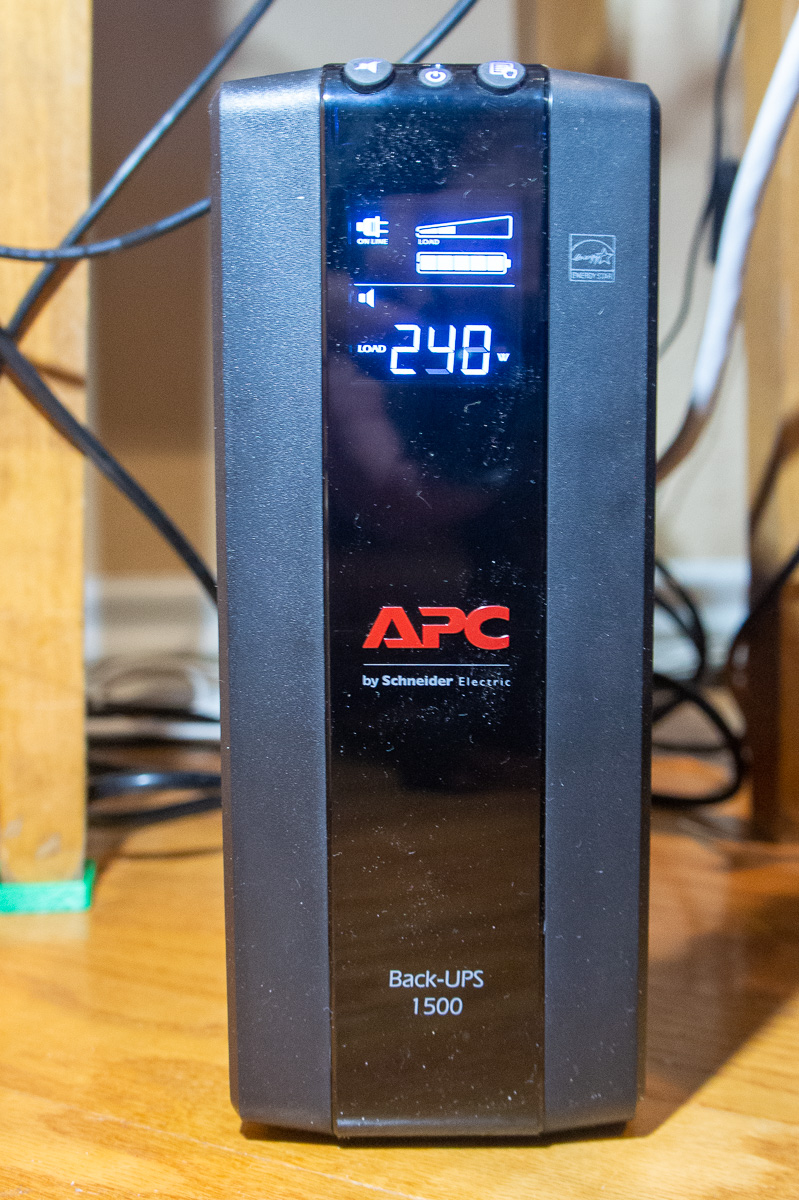
We have two printers connected to the UPS shown. Each will draw 250 watts when the print bed is being heated. Normal run wattage is about 50 for one printer and 100 watts for the other (part of the 250 total load). Not sure why the difference. The nozzle heater may be larger on the 2 color printer. Stand-by is 7 to 10 watts (steppers and fans off). Except for start-up the high wattage print beds cycles with about a 10% duty factor.
Peak load is about 500 watts, but it is not likely the UPS would be used when first warming the print bed. Average run load (per printer) is 50 to 100 watts. 150 watts with both printers running.
I selected a 900 watt APC UPS. The pure sinewave some units feature is not critical. The UPS unit wattage needs to be adequate for the full wattage it is intended to support when it assumes the load. It is also an indicator of how long it will operate under the load. The price class for the UPS shown here is ~$170.00
The Schneider APC has intelligent controls that display the power (wattage) being drawn. It then computes the run time for the present charge of the battery. (Other brands may operate differently) With one printer operating the indication is the UPS can carry the load for one hour on the battery. That more than meets my goals. Two printers would probably run for thirty minutes.
I have produced a video that demonstrates the action of the UPS in a simulated power failure. There is absolutely no hesitation in switching to the UPS when power is interrupted. The same when going back to normal power.
The UPS fully satisfies my needs and peace of mind about running long prints. I must point out my computers are NOT using the UPS so long prints are always run from files loaded by SD memory. There is no particular reason the computer could not also share the UPS but in my case, the printers are not close to the computers.
- Details
- Category: General Topics
- Hits: 1263
 I have figured it out! -- Why I am so hung on 3D printing.
I thought it was the actual printing. That is only part of it and was a huge part when I started a couple of years ago. The fascination of the process and how the machines operate is what got me interested. Watching a FDM filament printer running under CNC control was mesmerizing. It’s still that way today, but not like when I first started.
I have owned six different printers and still have five of them today. One of them is a DLP, resin and UV light. My first delta style printer I gave away when I upgraded to a slightly larger Delta of the same make and style. The printers are simply a tool. They create but are not themselves creative.
I realize today that printing is not what keeps me going. Once mastering the machine operation process and understanding several dozen variables and how they interact, printing is quite boring. Load a file, check parameters and material, push start and I am finished for one to twenty hours while the printer does its thing. No fun there.
What I really get excited about is the CAD drawing and the total control of creativity the computer drawing provides. The CAD is also just another tool. The 3D printer gives me the ability (the POWER) to produce a tangible item that I know I can make with the CAD drawing I have created on the computer screen.
It’s not the (brand) name of the CAD program that’s important. Like the 3D printers, some are easier to use or have more features than others. What works for one person may be a problem for someone else. The CAD doesn’t create anything. It is just a tool. It’s all about the person using it and their skills with the tool.
I had to learn the limitations of the printing system and design my creations within those limits. That is the same for any creative or artistic process. It’s that knowledge of the tools that separates the pros from the rookies.
If I couldn’t do the design thinking and the CAD work, I would have lost interest in the whole 3D printing operation. For me there was a period of fun learning to operate the printers (the tool) , but there is no creative outlet in just printing someone else’s CAD designs. Caring for and running the printer(s) is just a job, not an artistic expression. The art is in the design work. The fun for me is creating something original from just a conceptual idea.
The 3D printer is a tool that turns ideas into a tangible reality.