

- Details
- Category: Cetus2
- Hits: 938
Two Color Blend
Just created a new print combination on the Cetus 2. Combining nozzle one and nozzle three using a shadow purge. Nozzle one is a single color and nozzle three is a 50/50 color mix.
When nozzle three is in use for a print there is no possible way to use a purge tower. When flowing two colors 50/50 blend at the same time, the designers thought there would be no need for a purge. The purge tower function was therefore never programed In UPStudio3 to purge with nozzle three in use. (I know Cetus2 designers are re-thinking this limitation.)

- Details
- Category: Cetus2
- Hits: 1057
I decided to get back to reality with the two color printing of my pre-release Cetus2. I have spent considerable time experimenting and exploring the alternative methods of purging the color from the nozzle. This was like poetry in printing...
That exploration includes standard purge tower, purge tower internal to the model outline, On The Fly (OTF) color change, and what I call shadow purge using the interior fill of the print. They all are possible and all work to a certain degree of perfection. The one to use is a matter of choice and need.

- Details
- Category: Cetus2
- Hits: 886
Deeper Into the Shadows
I did some critical testing of the “shadow purge” I discovered with my Cetus2 (C2) printer. I caution to say this is not yet the approved “shadow print” method being developed by Tiertime for the release version. At least as far as I know.
I stated in a previous posting that I discovered (quite on my own) that turning on “Infill Preferred” causes a hidden purge within the interior of the print.
It worked quite well on a vase print I displayed. But I was concerned how it would do in fine details where there is not much purge area.

- Details
- Category: Cetus2
- Hits: 965
Hiding in the Shadows
My Tiertime UP Studio3 has been hiding its absolutely best printing feature right under my nose for almost a month. Far more impressive to me than the On The Fly (OTF) filament change.
OTF is a cool trick. But because of its limited application to the printing I love to do, I currently have little use for this feature,
But a little option hiding way down low in the PRINT options tab in the “Seam optimization section of UPS3, is the best feature in the entire package. It is labeled “Infill Preferred”

- Details
- Category: Cetus2
- Hits: 1239
Am I stuck?
Yes, and no. Read on…
Since it is so new, I have been spending most of my time exploring UP Studio3 (for Cetus2) and running many test and real prints on my new toy. The pre-release Cetus2.
Just read the latest update in the Kickstarter forum of Cetus2. I am NOT a big Facebook fan. My pre-release Cetus2 is soon going to be a bit obsolete as the production changes were listed. UP Studio3 is also getting some improvements.

- Details
- Category: Cetus2
- Hits: 948
In this report I take a look at CETUS2 color change in the normal print process.
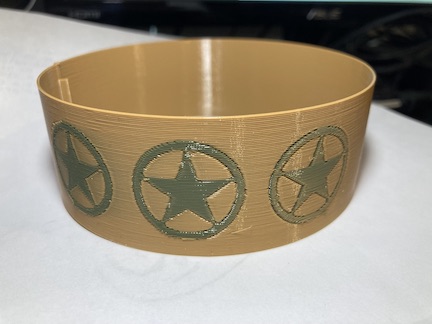
I designed a small test bowl with eleven horizontal stripes. Then I created a second version where I divided the bowl into quarters creating 44 sectors where I could alternate the colors within each row.
The lead picture displays the three variations of prints that were created.
The bowl on the left (#1) is a standard alternating color change in layers. This is the easiest print as there is no color purge required between layers. The short transisional color change can never been seen.
- Details
- Category: Cetus2
- Hits: 1565
On The Fly
One of the selling features of the CETUS2 two filament 3D printer is its ability to change colors On The Fly (OTF). That claim is entirely true. But it took me some time to figure out how to do it well.
The primary ingredient with the CETUS2 is its very short “combined filament path" within its special extruder nozzle. The two filaments are introduced to each other (for single nozzle extrusion) very near the exit point of the nozzle.

- Details
- Category: Cetus2
- Hits: 1620
In other articles, I mentioned the stringing, strands of light filament threads that are dragged out from the FDM print as the printer nozzle makes a non-printing jump move away from the printing surface to a new start location. It is caused by hot plastic flowing from the nozzle after it has been commanded to stop the flow.
Several adjustable factors are used to prevent this extra undesired flow. Retraction (reversing filament feed briefly) is the primary method to reduce or eliminate stringing. Temperature settings, retraction speed, retraction amount, pause, wipe, early stop, the list of “tweaks” seems endless. Sometimes it is an art rather than hard science to get the correct combination.

- Details
- Category: Cetus2
- Hits: 1083
Is it ugly? It’s at least very LOUD. Red and Yellow seem to be circus colors perhaps. In any case it catches my eye.
It is the colors I had so it was the colors I used. I’ll call it a party bowl.
The print was made on the CETUS2 and ran for almost 24 hours. Each one of the vertical color post are printed in layer sequence, one at a time. then switch colors and repeat on the same layer (0.2mm high).

- Details
- Category: Cetus2
- Hits: 1156
My Cetus2 has me trying all kinds of silly "JUNQUE" print projects, but I am having a great time playing in Fusion360 CAD, UPStudio3, and Feeding CETUS2 directly (via USB) from Wand.
I am learning a lot of new tricks with UPStudio3. Like moving support creation output between 3 extruders by moving entity codes between extruders. Don't ask me. Let Jason explain. :)
I currently have a problem getting eaisly removeable supports using mixed colors. Single colors no problem. We are still in prototype mode so a lot may change.